

I was bored with Raspberry Pi 3B because my AlexaPi project had to be on hold. Why? Well, it seems the credentials that Amazon issued to me as developer expire pretty fast, I was only able to play with it for about a week. It was fun and exciting to play with, so it really makes anything else boring. So I think . . .
Then something came up, I was fiddling with hard disk partition tool on Windows, one thing leads to another, I deleted the entire C drive by “accident”, so I had to reinstall Window 10 on my machine. This incident got me thinking, what if it happened to my data drive where all of my projects live on? All the source code would be gone if that happens. But installing a dedicated NAS server at home is kind of messy — think about the noise, the power consumption, the maintenance of it. Then the idea came — what if I can build a NAS server using that Raspberry Pi 3B?
Here are some benefits of using a single board computer to do this job — small form factor, quiet, little maintenance, and since I do not need much space to store huge amount of data, just those source codes and projects file (as SVN repositories), a low cost micro SD (TF) card could be more than enough. Fortunately, the TF card I got for the Raspberry Pi 3B is a 64GB Sandisk Extreme Pro, it is fast and has enough room for me.
So, I set out to see if this is possible. And of course, there are these Open Media Vault people who have done amazing work building NAS software for all kinds of platforms, including Raspberry Pi 3B. So here are the steps to make it happen.
Preparation
Hardware wise, make sure the following:
- the hardware is capable of running OpenMediaVault, some Raspberry Pi boards do not work as they are less powerful. Please check it here about which board is supported
- A high capacity, high speed micro SD card, such as my Sandisk 64GB ExtremePro. The faster the better as it will be used as both a boot device and data storage device. In terms of capacity, since I do not have much data to store, only some SVN source code repositories, 64GB is more than enough for me.
- A monitor, mouse, and keyboard are needed. These are used to log into the Raspberry Pi directly for some necessary modification in case something goes wrong. I did encounter one that took me 4 sleepless hours to figure out.
- A USB card reader to write the system image onto the micro SD card using a free software, Etcher (more on this)
- One thing I find extremely useful is to connect the Raspberry Pi 3B to the network via wired Ethernet cable, this reduces the “troublesome” wifi configuration. But if you are an expert in do that, this is optional.
Software wise, here are the things we need:
- The boot image of Open Media Vault for Raspberry Pi 3B This is the image that I used and it seems pretty stable. It contains both the operation system and the NAS software.
- Get Putty application. This is optional but it will help a lot later. This is used to login to our NAS server remotely via SSH and do some maintenance, etc. If you have Windows, Microsoft has quietly installed a feature called SSH client. You can enable it in Windows and use that.
- It is recommended to use the Etcher software to burn the image onto a removable media on a USB card reader. It is rather smart, you do not have to do any of the partitioning stuff, you pick a boot image and then pick a removable device and click FLASH, you are done. Very straight forward.
Installation
Basically, here are the steps to configure the Raspberry Pi as NAS server using Open Media Vault software.
- Burn OMV Image
- Boot Up Raspberry Pi Using SD card with OMV image
- Login as super user on the Raspberry Pi
- Prepare the SD card to use un-allocated space as data storage.
- Finding IP address of the Raspberry Pi on the network
- Use browser on another machine to access configuration interface
- Change some basic settings, such as password, date and time, etc
- Double check the data partition is there
- Managing user account so people can login to use the NAS
- Adding shared folder
- Enabling file sharing service, SMB/CIFS on the network
- Make the shared folder visible to the network by sharing it.
- Optionally, enabling super user login via SSH
Step 1: Burn OMV Image.
Use Etcher to burn the OMV image onto the micro SD card (also called TF card) like the picture below.

Step 2: Boot Up
Put the micro SD card in the TF slot on Raspberry Pi 3B and turn on the power. It will take some time, depending on how fast your SD car is. With my Sandisk Extreme Pro, it was fast enough to notice any delay.
Step 3: Login As Super User
Log in as root and change the root password. The default password for root is “openmediavault”, once you type in the right password, it will ask you to change password for the root for security reasons. So make sure you type in the same password (at beginning it is, again, “openmediavault”) again and it will prompt you to enter new password, twice.
Step4: Preparation Of Unused Partition On SD Card
Some explanation here before continuing. It seems that once the image is burnt onto the micro SD card, three partitions are created on the SD card. One is boot partition, one is system partition, and a third partition which is left unformatted. The first and the second partition together take up about 8GB of space and the rest is for the third partition. In my case, my SD card is a 64GB one, so the rest is about 52GB (not 56 for some reason). But this partition is unformatted.
So, once we logged in as root, and since our goal is to use the same SD card as storage device as well, we need to format this third partition. To see the list of partitions, you can use this command
lsblk
the result might look something like this:

So, to format the third partition, /dev/mmcblk0p3, in EXT4 file format, we can issue this command
mkfs.ext4 /dev/mmcblk0p3
It will take a little while depending on how fast and how big your SD card is. Now, we have created a third drive on the SD card and this will be used for our data storage. After reboot, this drive will be mounted automatically.
Step 5: Finding IP Address Of The NAS Box.
We need to find out the IP address of the NAS Raspberry Pi box. To do this, you can issue this command to get its local IP address
ifconfig
and the result looks like the following. Note the IP address in red is the IP address we use to access it from another machine.

The IP address in red rectangle is the IP address we use to access it for configuration.
At this point, we are done on the Raspberry Pi itself for NOW. I personally would shut it down and reboot. Now we are ready to configure the NAS from another machine with browser.
Step 6: Configuration Of NAS Via Browser.
Use another computer with internet browser and type in the IP address found in previous step (outlined in red). The following will come up:

Here, type in “admin” as user name and “openmediavault” as password. Once logged in, the browser looks like a typical router configuration interface, very intuitive and clear.
Step 7: Basic Configurations
Next is to change some “General Settings” such as change the default password (“openmediavault) for admin to something else that only you know.

Also recommended is to change the date and time so that when you put files on this NAS server, it will get the right timestamp, etc, etc, the most basic settings. Remember to click on APPLY when prompted to finalized the change. Without it, the change will not commit and the feature will not work
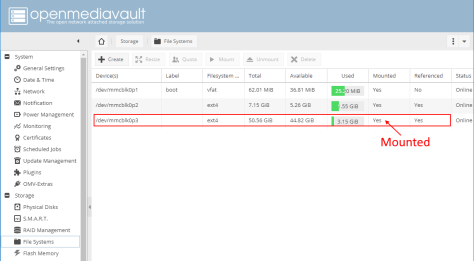
Step 8: Verifying File System
Click on “File System” on the left hand side and make sure the partition we created in Step 4 is there and is mounted. If it is not mounted, there is a tab at the top to mount it. Remember every change we make, there will be an “APPLY” prompt and we MUST click on it to finalize the change.
Step 9: Managing User Account
To have access to the NAS Raspberry Pi box, we need to create some user account that has sufficient privileges to access storage on this Pi. For me, I am just adding one user for all clients that wish to connect to this NAS box. This makes it easier to administrate. Adding a user is easy, on the left column, there is a option called “User”, click on it, you will get the following screen:
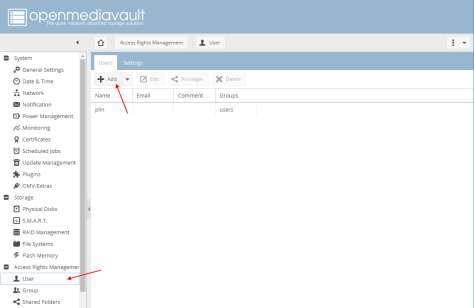
Simply enter user name and password (password confirm) and that is it. Do not worry about “Privileges” yet, we will come to that. Remember to click on APPLY when prompted to finalized the change. Without it, the change will not commit and the feature will not work.
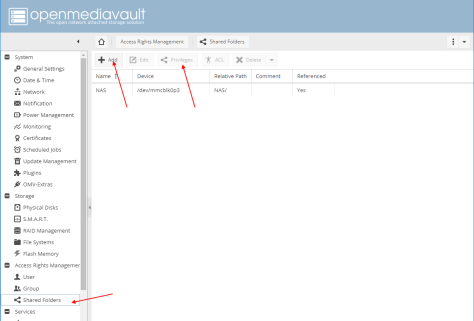
Step 10: Adding A Shared Folder
Click on the “Shared Folders” and arrive at the following screen. Click on the “Add” tab to add a new shared folder. Notice that there is a “Privilege” tab on this page, it is an important tab and we will get back to it later.
After clicking on the “Add”, you will see the following screen:

Enter a Name for the shared folder, in my case, I put in “NAS”, next you MUST select a device. In this case, pick the device that we created back in Step 4. I left other entries alone as default. Again, remember to click on APPLY when prompted to finalized the change. Without it, the change will not commit and the feature will not work
Once a shared folder is created, now we need to assign privilege to it, meaning, we need to manage user account to have access to it. This is where we need to click on the “Privilege” tab and you will see following screen.

Here you can simply assign READ/WRITE rights to a user (or users) we created in Step 9. Again, remember to click on APPLY when prompted to finalized the change. Without it, the change will not commit and the feature will not work.
Step 11: Enabling Network Service
This is an important step and be honest, I struggled a bit here — without this step, I tried to map a network drive on my Windows 10 machine but I could not find one. So having created a shared folder is NOT enough, we also need to choose a network service to let other machine know that the Raspberry Pi NAS can provide file sharing function. After some thought and googling (on the term SMB/CIFS, Server Messeging Block and Common Internet File System), I decided to enable the SMB/CIFS service. To do so, just expand Service on the left hand side and pick SMB/CIFS.

Essentially, I did not do anything at all except enabling the service. Again, remember to click on APPLY when prompted to finalized the change. Without it, the change will not commit and the feature will not work.
Step 12: Adding The Shared Folder To SMB/CIFS Service
Again, this is the tricky part, without this step, other machines will till not be able to find our shared folder. Still in “SMB/CIFS” page,
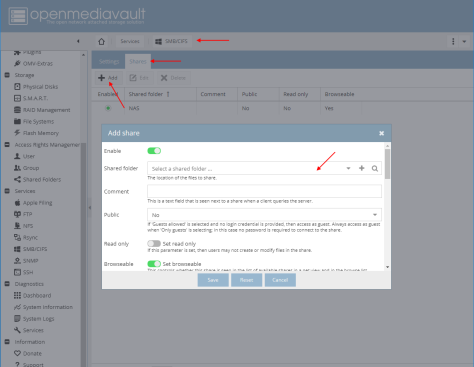
In above picture, notice the part with red arrow. After clicking on “Add”, you can select the shared folder created in Step 10. Again remember to click on APPLY when prompted to finalized the change. Without it, the change will not commit and the feature will not work.
Step 13: Allowing Root Login On SSH Service
This step is kind of important but really optional because after Step 12, the shared folder is available and can be mapped from a Windows 10 machine. However, if you want to make changes to your NAS server remotely — logging in via SSH, very often you would need super user, such as root, access to modify things. But, by default, OMV NAS software does not allow super user login (ie, root) via SSH, you have to turn this feature on. So, click on the SSH on the left hand side under Services (expand it if it is not already so). There is an option that says “Permit root login”, turn it on. Again, remember to click on APPLY when prompted to finalized the change. Without it, the change will not commit and the feature will not work

Now, this is where I spent 4 sleepless hours on — after turning on the “Permit root login”, for some reason, when I use Putty to try to connect to the NAS box via SSH, I keep getting “Putty Fatal Error : Software caused connection abort”. After googling for this error, I tried everything without success. It turns out, it was NOT the SSH client side (Putty or Windows SSH), it was the server side, ie, the Raspberry Pi NAS box. This is what I did to figure this out. First, get back to the console of the box and login as root, and type this command
systemctl status ssh.service
to my surprise, some error showed up saying some digital keys are missing. I guess when I turned on “Permit root login” over SSH feature broke the system. But since I now know it was the NAS box its self, it is easy to fix it by issuing the following commands:
- first stop the SSH service: systemctl stop ssh.service
- then regenerate the keys: .\usr\bin\ssh-kegen -A
- then restart SSH service: systemctl start ssh.service
Voila, after this, I was able to connect to the NAS box via SSH using Putty.
Summary
Though after some test, copying a 4GB file over to this NAS server, the performance is acceptable, at around 6MB per second. I think this is limited by the fact that data are stored on the SD card. Even at this speed, playing a full HD video off this server is not a problem at all.
Adding a USB 2.0 based SSD (120GB Sandisk Ultra Plus), the copying speed increased to 10MB per second. I believe this is limited by the fact Raspberry Pi has 100mb ethernet instead of gigabit ether net. I also wish Raspberry Pi has USB 3.0 port so that I can attach a USB 3.0 based SSD card.
Another potential point is if a SD card is good device to store a lot of data. But since I do not copy files over too often, there will be much less read/write operations on the card compared to, say a DSLR, so I guess it could be OK.
The up side is, the whole setup is small, quiet and consumes less power, it could be left underneath some table and not worry about. With SSH, we do not have to have keyboards, mouse, nor the monitor attached to it.

Great idea Peter!
LikeLike
Thanks
LikeLike
This is the best guide! I got it working in no time thanks to you.
I know NAS shouldn’t use WiFi, but for the one who needs it, Peter can try to include these alternative connection.
After login as root
To connect to WiFi: nmtui-connect
To forget the WiFi: nmtui-edit
Using the class10 microSD as shared storage, laptop on 5GHz WiFi, the average speed I get is as below.
(NAS) WiFi: write(50Mbps), read(54Mbps)
(NAS) Ethernet: write(97Mbps), read(132.43Mbps)
LikeLike
One more thing. The NAS I’m using is raspberry pi 3 model B+. Which explained the better throughput compared to previous model. 😉
LikeLike
Anyway to get gigabit Ethernet to work on this?
LikeLike
It works by default, if you are going to get Raspberry Pi 4, then you will get true gigabit. 3B+ does not have true gigabit network.
LikeLike