

Overview
Unreal Engine allows multiple computers to be utilised in a form of so called Swarm Farm. A swarm farm is a collection of computers, each running a special software called Swarm Agent, and one computer running another special software called Swarm Coordinator. The computer running the coordinator can also be an agent, ie running Swarm Agent software, and be part of multi-computing scheme.
It is rather easy to set up a swarm farm for Unreal Engine. Basically, it involves copying all the files in a folder, for example, mostly like will be something like this:
C:\Program Files\Epic Games\UE_4.25\Engine\Binaries\DotNET
If you have installed Unreal Engine is the default direction. In that folder, Swarmagent.exe and SwarmCoordinator.exe can be found. Simply copy this folder to all computers that are part of swarm farm. Important note: it is not necessary to install Unreal Engine on all computers in the farm, just all the files in this folder. All computers must run Swarm Agent to be part of farm and one and only one computer should run SwarmCoordinator. This blog will be focused on my experience with running a three computers swarm farm, so for details on setting up swarm farm, there are many videos out there on the internet about how to do it. Specifically, this video by Ryan Manning, it is the video I followed to set up my swarm server.
TEST SETUP
In my swarm farm, I have three computers and here are their configurations:
WSI5
Intel I5-8500 @3.4Ghz, Asus ITX mother board, 32GB RAM, two 500GB SATA3 SSDs in RAID 0 configuration to form a 1TB drive, one 1Gb ethernet port, one ConnextX 312 with two 10Gb optical ports, but only one port is connected to a 10Gb optical switch. This computer is located in an office at first floor. The CPU has six cores and six logical cores.
HNZ1
Dual Intel Xeon E5-2678V3 @2.4Ghz, Huananzhi X99-T8D mother board, 128GB RAM, one 2T Samsung NVMe M.2 SSD, one HP 500G SATA SSD, one Samsung 128G SATA SSD, two 1Gb ethernet ports, one ConnectX 312 with two 10Gb optical ports, both are connected to the same 10Gb optical switch. This computer has 2×12 = 24 cores with hyper threading, so total of 48 logical cores.
Dell R720 Server
Dual Intel Xeon E5-2696V2 @2.2Ghz, 128GB RAM, one 500G SSD, two 600G SAS HD configured in RAID 0 for a total 1.2TB, two 10Gb DAC (direct access copper) ether ports connected to 10Gb optical switch via two optical to copper converters, two 1Gb either net ports. This computer has 2×12 = 24 cores with hyper threading, so total of 48 logical cores. This computer was purchased off surplus market at incredibly affordable price considering its configuration.
Swarm Farm Setup
My swarm farm mainly consists of these three computers, namely, WSI5, HNZ1, and R720. To be precise, maybe this setup should be considered as distributed computing rather than a “farm”. The WSI5 and HNZ1 are located at an office on first floor and the Dell R720 is located in basement. Baking jobs can be launched from either WSI5 or HNZ1, it is actually good thing to do tests.
All computers are linked with 10Gb network with custom network configuration with HOST file. They are also on the same 1Gb Ethernet network with a router. The reason for 10Gb network is to avoid network bound bottleneck. The 10Gb link to basement is a little slow, roughly about 6Gb due to optical-to-copper adapter being used. It is still very fast.
The R720 and HNZ1 are comparable in terms of computing power with R720 scoring 2750 on average and HNZ1 scoring 3320 on average with CineBench R-15 benchmark. While the WSI5 scores roughly 950 on average with CineBench R-15 benchmark, so it is roughly about 1/3 of the performance of the other server. Special note is that both R720 and HNZ1 have 48 logical cores and 128GB of RAM, enough to handle most of the jobs.
Unreal Engine Project Used
The project used in this test was purchased off Unreal Engine Market Place, it is by Wooden Design. It is fairly complicated in terms of a home project but probably is on the lighter side when it comes to real architecture visualisation. Nonetheless, it is good enough to test how swarm farm works and how well it works as it takes over one hour to build a production quality lighting build.
Important note, all tests done are for high quality lighting build, not production build
OBSERVATIONS & TIPS
One of the key point to use a swarm farm is to utilise multiple computers to help building, “baking”, lighting for visualisation. However, after building and using a swarm farm, albeit a small one, it does not seem to be a simple matter of adding more computers to the farm, there are things to watch out and there are ways to optimise it.
Baseline Measurements
Scenario #1 — Stand Alone Mode On HNZ1
When running a baking job on the HNZ1 machine without any swarm farm, it started at 12:49:36 and finished at 1:17:17, or for a total time of 27 minutes and 31 seconds.

Scenario #2 — Start Job On HNZ1 Also Part Of Swarm Farm + R720
In this scenario, both HNZ1 and R720 are part of swarm farm and the baking job was started on HNZ1. From the following screen shots, we can see how each computer performs. The baking job was started at 11:43:39.
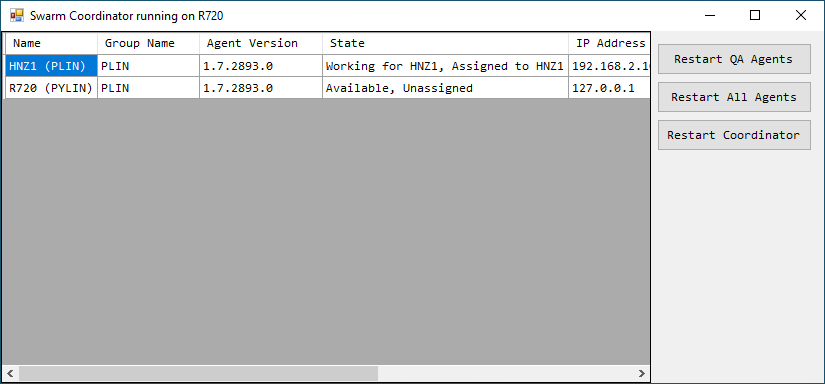
The R720 finished all of jobs and tasks assigned to it at 12:01:06, so it took about 17 minutes and 22 seconds. There does not seem to be more, so it became available according to Swarm Coordinator.
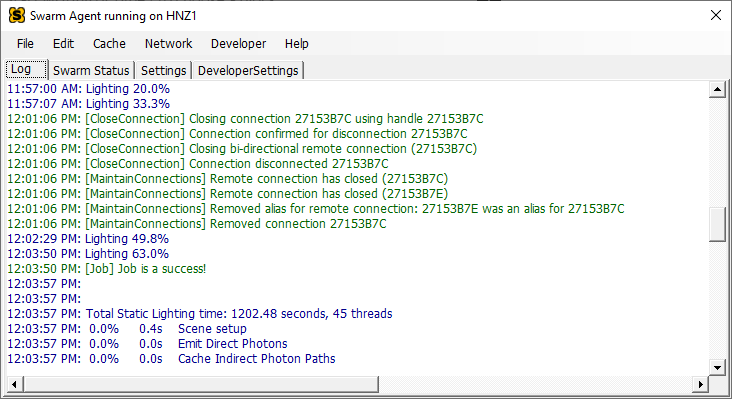
The HNZ1 was done and the baking job was complete at 12:03:57, so it took 20 minutes and 18 seconds to complete the job. So, after R720, it took the HNZ1 additional 2 minutes and 51 seconds to finished the job.

Scenario #3 — Start The Baking Job On HNZ1 With All Three Computers In Swarm Farm
In this scenario, all computers are part of Swarm Farm and the baking job is started on HNZ1 at 12:20:38 The WSI5 finished all jobs and tasks assigned to it at 12:34:38, or it took 14 minutes. The R720 finished all the jobs and tasks assigned to it at 12:35:01, or 14 minutes 23 seconds.
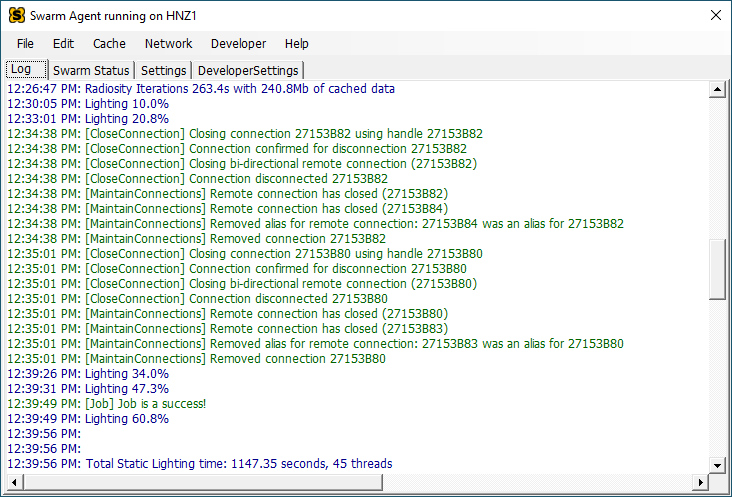
The whole job finished at 12:39:56 or it took 19 minutes 19 seconds for this particular run. Over repeated runs with this configuration it is about 18 minutes.
Overall trend is that adding additional computer in swarm farm improves performance. Though in scenario #2, adding a similar performance computer, the R720, only increased performance by about 26%, it is probably due to some over head when there are only two computers involved. In scenario #3, it shows adding a slower performance computer, the WSI5, actually improved performance comparable to what it could contribute overall.
Network Performance
From all the runs during tests, it does not seem that network is the bottleneck, traffic are light, This may very well be that the project is not big enough, lack of heavy assets. So, this remains to be investigated further in future blog(s) with even larger projects.
Assigning Number Of Logical Cores To Local Machine
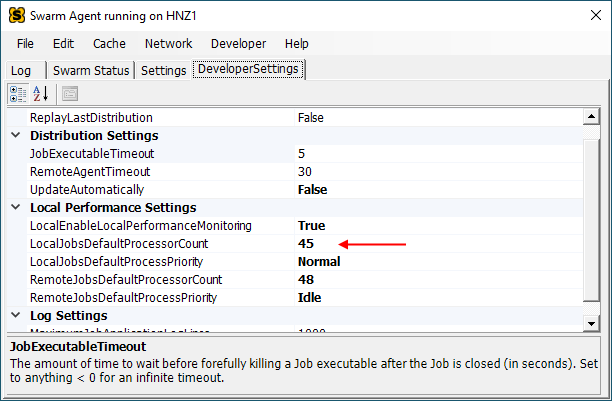
It has been observed during test runs that when “LocalJobsDefaultProcessorCount” is set too high, for example, same as available logical core counts, when a baking job is launched from this machine, it tends to crash randomly. It does not always crash, but often enough to use it for any serious work. When crash happens, no further rendering and the process simply stops. Unfortunately, setting “LocalJobsDefaultProcessorCount” by default is set to the same as available logical core count, so be sure to check this value on the machine to be used to launch baking jobs and is part of the swarm farm.
Does It Matter Where The Job Is Initiated?
In many offices where swarm farm computers are located in a remote area, such as computer room or another office. This is also the beauty of distributed computing. Artists can have their own powerful workstation or they can have a laptop, which often less powerful but so convenient to use, testing their work at low build quality first. So what happens when an artist want to bake lighting at production quality using swarm farm servers?
Scenario #1 — Use a low performance machine (laptop) to start a backing job and also as part of swarm farm.
It is natural to think that using the machine that launched baking job as part of swarm farm to help out. In particular, if the machine that started baking job is a low performance one, such as a laptop, and also part of swarm farm. What could go wrong, right? Well, lets see what is happening when a local machine is configured as part of swarm farm and participate in computing.
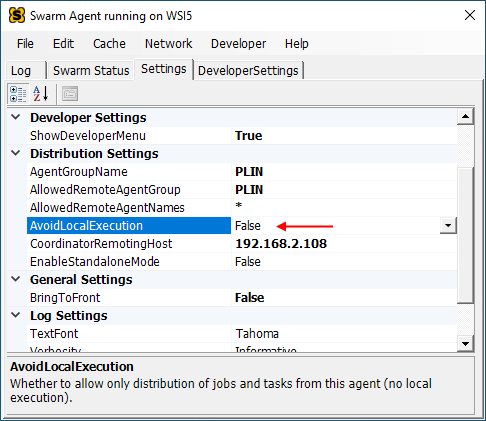
To configure local computer to be part of computing in swarm farm, you can set “AvoidLocalExecution” to “False”, which actually is the default setting. So lets do that on a low performance computer, the WSI5.
With this setting and with both R720 and HNZ1 high performance computers as part of swarm farm, it took 39 minutes on average to finish building lighting at high quality setting.
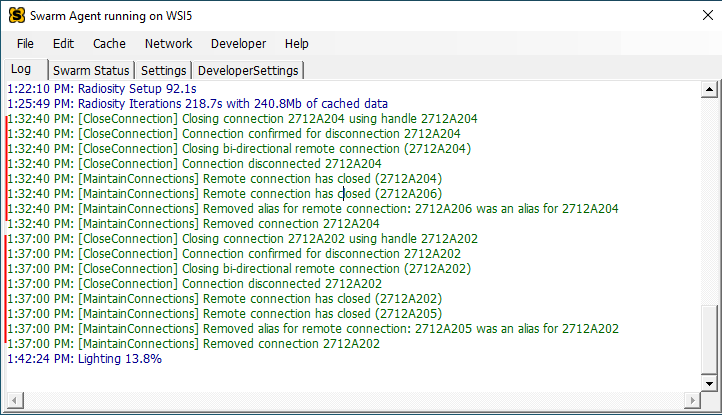
That 39 minutes seems a long time compared to other tests with both HNZ1 and R720 as part of swarm farm. What happened? Lets’ take a look at the SwarmAgent log on the WSI5, the job started on 1:20:13. It shows one of the remote computer (it is the R720) finished its task on 1:32:40, or it took about 12 minutes 27 seconds. The other swarm computer finished its tasks on 1:37:00, or it took about 16 minutes 47 seconds.
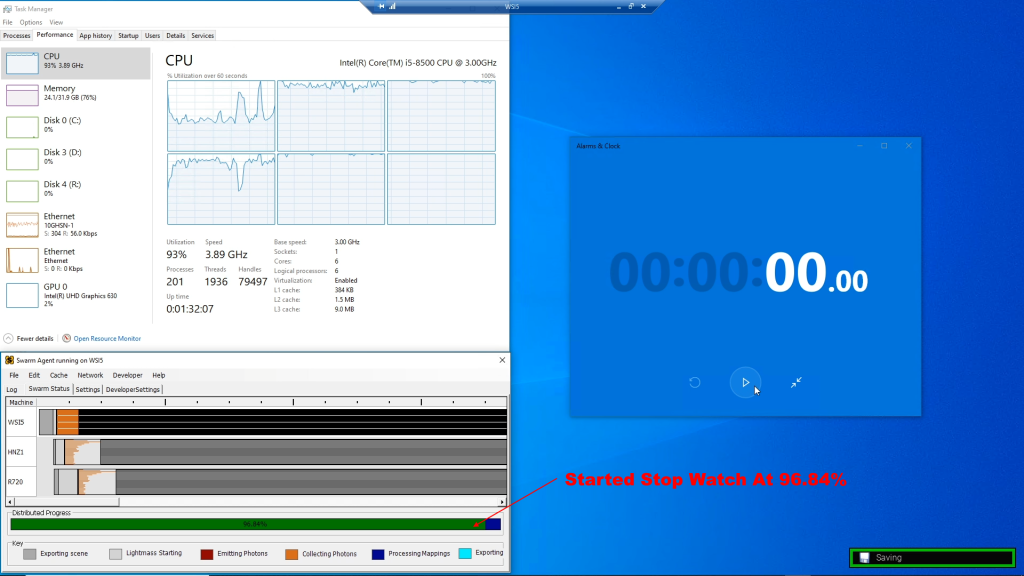
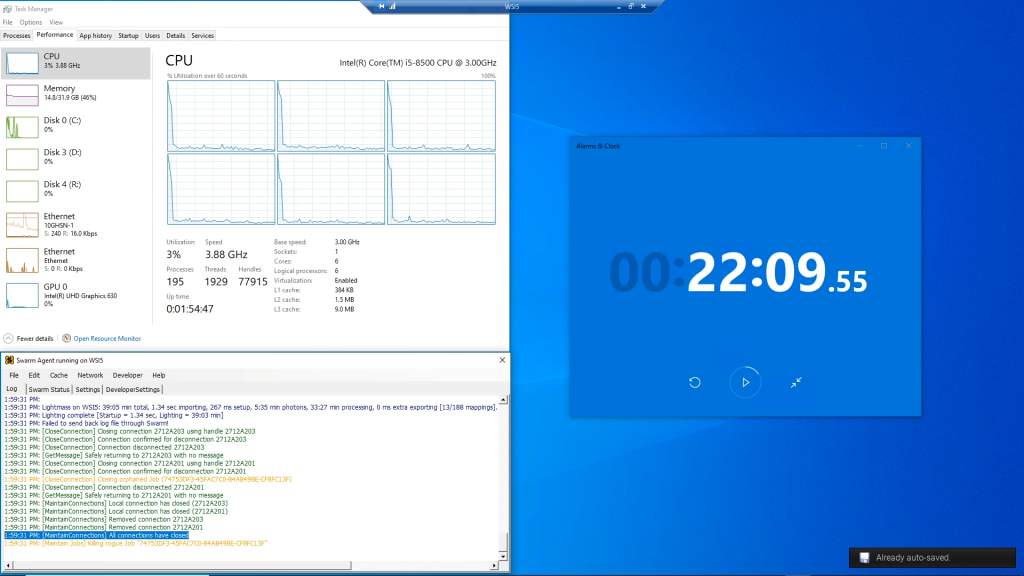
Both numbers seem to be fine for HNZ1 and R720. However, here are two screen shots, one shows when progress was stuck at 96.84% and stop watch was started. Another screen shot show when building lighting finished. A whopping 22 minutes and 9 seconds
This is true for all repeated tests with same settings. So why did it take 39 minutes on average to finish building lighting? It is the tasks that the local machine, the slow WSI5, must finish to complete the build. Since the WSI5 is a low performance machine, it actually took much longer to do the rest of the task! Bumper!
Scenario #2 — Use a low performance machine to start a baking job, but exclude it from part of swarm farm.
Unreal Engine allows a computer to be excluded from swarm farm by setting “AvoidLocalExecution” to True. What does it mean? It means that if a baking job is started on this machine, no task will be assigned to itself, besides sending necessary data to remote machines. This also means after all tasks assigned to remote machines are complete, the final tasks to complete the job are also off loaded to a remote machine., which most likely a much faster machine.
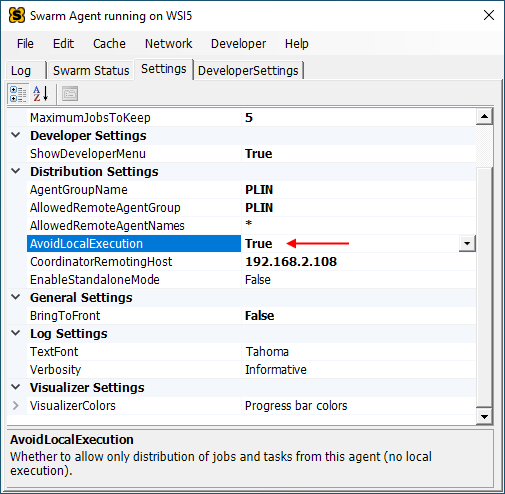
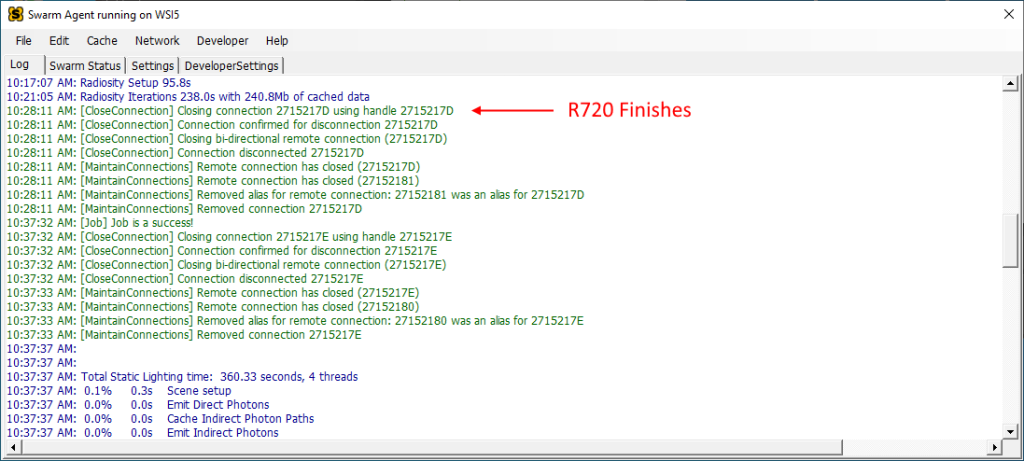
So, in my setup, the WSI5 is the slowest machine and lets see how it performs by setting “AvoidLocalExecution” to True. The job was started at 10:15:13 and at 10:28:11, the R720 finished its jobs and tasks and became available as shown in Swarm Coordinator.
The reason it is the R720 that finished its jobs and tasks can be seen from screen shot of Swarm Coordinator
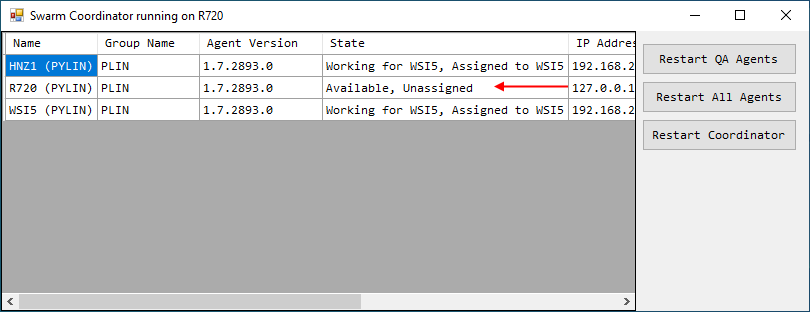
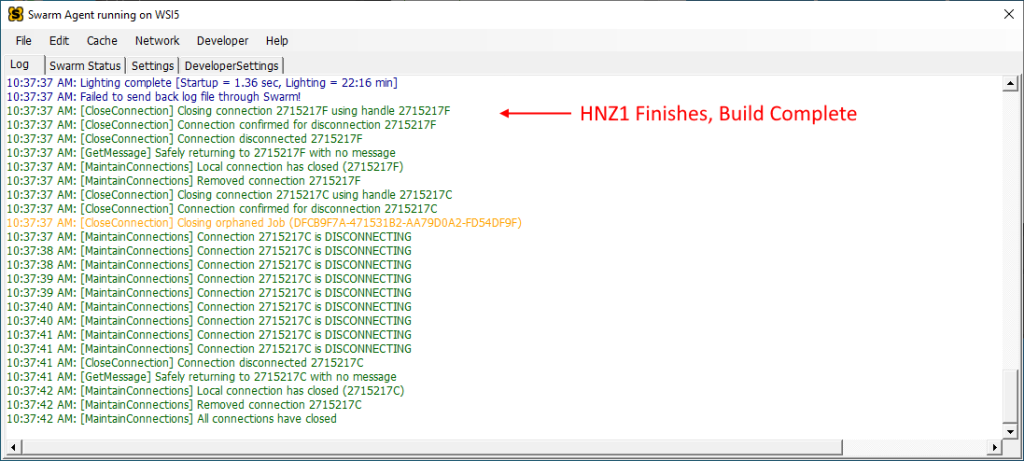
However, after R720 finishes, the HNZ1 continues until the baking job is done. The HNZ1 is not only tasked to complete whatever jobs and tasks assigned to it, but also the tasks of combining all results and complete the build.
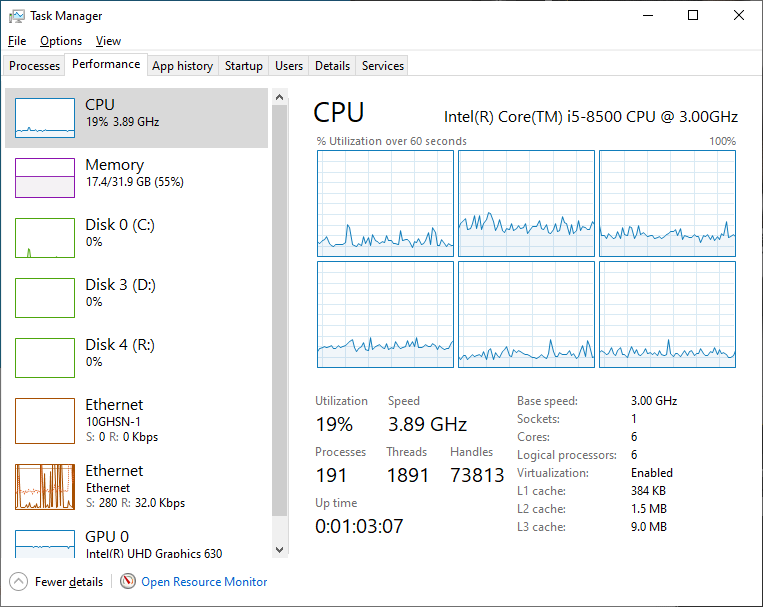
The WSI5 on the other hand essentially remain much less burdened as shown by the screen shot of task maanger, utilisation is only about 19% during this period of time.
From the screen shot of WSI5, we can see that the job (Wooden Design project with High Quality setting) started at 10:15:13 and the following are screen shots of Swarm Agent log on WSI5 and finished at 10:37:42, so it lasted about 22 minutes and 29 seconds. This is a little longer than the 20 minutes it took when the job is started on HNZ1 and is part of swarm farm and R720 in the swarm farm. So there are some overhead involved, nonetheless, it is far better than having WSI5 as part of swarm farm (when AvoidLocalExecution is False)
Does That Mean A Slow Computer Can Not Be Part Of Swarm Farm?
The answer is that as long as the slow performance computer is not the one launching the baking job. Or if it is, do not let it be part of swarm farm. As matter of fact, as my next set of experiments show, if a baking job is started on a high performance machine, such as the HNZ1, adding a slow performance machine, the WSI5, indeed helps cutting down overall time. This is basically the scenario #3 in baseline tests.
Yes adding a slow performance machine to the swarm farm does help as long as it is not the one starting the backing job. So, in an office environment, maybe it is a good idea to employ all the idle machines in the office to be part of swarm farm to help out.
If Double Computing Power, Double Baking Speed?
This is the part that is hard to figure out as I only have three computers. When WSI5 is not used, starting the baking job on the HNZ1 alone took 27 minutes on average to finish (high quality). However, adding the R720 in the swarm farm only reduced time to 20 minutes, roughly 26% reduction of time. It seems that the remote computer R720 finished the tasks assigned to it much earlier than overall time. This is probably due to the fact that when all assignable tasks are finished, either by remote machine or local machine, there are tasks to combine the results to complete the build by the launching machine (in this case, the HNZ1), this phenomenon is also supported by previous experiment where it took a slow performance machine LONG time to complete the build after both high performance machines finish the assigned tasks.
Also, as mentioned previously, adding a slow performance machine to the swarm farm does help and it is almost comparable to the increase of amount of computing power: HNZ1 and R720 both have 48 logical cores, totalling 96 logical cores. The WSI5 has 6 cores but running at higher clock, so in terms of performance increase, this amounts to about 10%, roughly that is. This shows there are some degree of scalability by adding another machine, be it a slow one or not.
CONCLUSION
- Set “LocalJobsDefaultProcessorCount” to less than total available logical core counts if the machine is used to launch a baking job and is part of swarm farm, this includes when it is processing a baking job alone.
- If a baking job has to be started on a low performance machine, do not let it be part of swarm farm, set “AvoidLocalExecution” to True!
- Even if a baking job is started on a low performance machine and this machine is not part of swarm farm, it will still slow down overall performance a little bit.
- If possible, start a baking job on the highest performance computer so that the last remain task can be executed quickly
- Even though adding one machine to a single machine operation does not scale it up by much due to some overhead, adding more machines, be it high performance or not, it does scale up.
- It does not seem that network is a major issue for the test project, it is still better to add high speed links between all swarm computers, just in case some project contains heavy assets and they have to be moved around between computers
- Because, at this point, Unreal Engine does not use GPU, so CPU counts matter a lot. There are a lot of surplus servers on the market, such as my Dell R720 can be a very good choice. These servers also have a good feature — remote management. They can be started up and shutdown remotely
- Some specialised motherboards, such as Huananzhi T8D. are designed for utilising surplus Intel Xeon processors that have high count of logical cores, so they are also good choice building swarm farm on a budgets
- There are also surplus dual CPU motherboards that accept Intel Xeon processors, they can be good choice, too


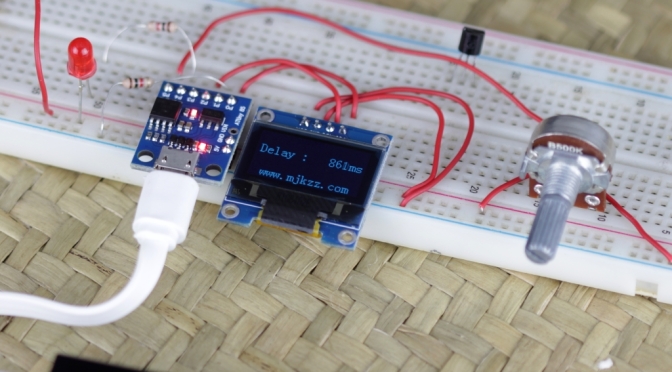


 Arduino output matches (closely) caliper reading. There are some discrepancy, but I think it the poor caliper that is displaying wrong data